WSL2配置Docker配置机器学习环境
仅教程只适用于WIN10下没有Mirrored网络模式下的配置,如果你是WIN11,那么请移步Win11下的WSL2配合Docker搭建深度学习环境,这里有更好的配置体验。另外,本片文章写的较为杂乱,只作为记录贴,需要有一定的环境配置基础,了解你自己在干什么。
完整教程:在 WSL 中配置 Docker 及 GPU 环境并实现局域网访问
背景介绍
Windows Subsystem for Linux (WSL) 为 Windows 用户提供了一个完整的 Linux 环境,而不需要使用传统的虚拟机。配合 Docker 及 NVIDIA GPU 支持,可以在 Windows 系统上构建强大的机器学习开发环境。然而,默认情况下,WSL 使用 NAT 网络模式,这意味着局域网中的其他设备无法直接访问 WSL 内的服务。本教程将详细介绍如何配置这一环境,并通过端口转发实现局域网设备对 WSL 和 Docker 内服务的访问。
第一部分:安装 WSL 2
1.1 启用 WSL 功能
首先,我们需要在 Windows 10 系统上启用 WSL 功能:
- 以管理员身份打开 PowerShell
- 执行以下命令启用 WSL 和虚拟机平台功能:
1
2
dism.exe /online /enable-feature /featurename:Microsoft-Windows-Subsystem-Linux /all /norestart
dism.exe /online /enable-feature /featurename:VirtualMachinePlatform /all /norestart
- 重启计算机以完成功能启用
1.2 更新 WSL 2 内核组件
- 下载并安装 WSL 2 内核更新包
- 再次以管理员身份打开 PowerShell
- 将 WSL 2 设置为默认版本:
1
wsl --set-default-version 2
1.3 安装 Ubuntu 24.04
注意,安装的时候会缺省的将hostname设置为你的宿主机的名称。
有两种方法可以安装 Ubuntu:
方法一:通过 Microsoft Store
- 打开 Microsoft Store
- 搜索并安装 “Ubuntu 24.04 LTS”
- 安装完成后启动 Ubuntu,等待初始化完成
- 设置 Ubuntu 用户名和密码
方法二:通过命令行
- 在 PowerShell 中执行:
1
wsl --install -d Ubuntu-24.04
- 安装完成后,系统会自动启动 Ubuntu 并要求设置用户名和密码
1.4 验证 WSL 安装
在 PowerShell 中执行以下命令,确认 Ubuntu 使用的是 WSL 2:
1
wsl -l -v
输出应类似于:
1
2
 NAME            STATE           VERSION
*Ubuntu-24.04    Running         2
迁移WSL位置
准备和验证
查询已安装的子系统
1
2
3
4
5
6
wsl -l

# 适用于 Linux 的 Windows 子系统分发:
# Ubuntu-24.04 (默认)
# docker-desktop
# docker-desktop-data
查询wsl安装的Ubuntu24磁盘位置, “Ubuntu-24.04”为需要查询的子系统版本
1
(Get-ChildItem -Path HKCU:\Software\Microsoft\Windows\CurrentVersion\Lxss | Where-Object { $_.GetValue("DistributionName") -eq 'Ubuntu-24.04' }).GetValue("BasePath") + "\ext4.vhdx"
结果如下,默认在C盘(使用微软商店安装的情况下)
C:\Users\用户名\AppData\Local\Packages\CanonicalGroupLimited.Ubuntu24.04LTS_79rhkp1fndgsc\LocalState\ext4.vhdx
迁移
– move后指定目标位置,这里我放到d:\ubuntu下
wsl –manage Ubuntu-24.04 –move d:\ubuntu
验证
1
2
3
(Get-ChildItem -Path HKCU:\Software\Microsoft\Windows\CurrentVersion\Lxss | Where-Object { $_.GetValue("DistributionName") -eq 'Ubuntu-24.04' }).GetValue("BasePath") + "\ext4.vhdx"

#d:\ubuntu\ext4.vhdx
参考
1.5 配置WSL代理
直接去参考
https://eastmonster.github.io/2022/10/05/clash-config-in-wsl/
https://zhuanlan.zhihu.com/p/153124468
1.6 美化shell+便捷代理开关
https://zhuanlan.zhihu.com/p/68336685
安装 zsh
先看下自己有哪一些 shell
1
cat /etc/shells
如果没有 zsh 需要安装
1
2
3
4
sudo apt-get install zsh #Ubuntu Linux记得先升级下 apt-get
sudo yum install zsh #Redhat Linux

chsh -s /bin/zsh #安装完成后设置当前用户使用 zsh 并重启 wsl
安装 oh my zsh
此时我们需要下载 oh-my-zsh
1
sh -c "$(curl -fsSL https://raw.githubusercontent.com/robbyrussell/oh-my-zsh/master/tools/install.sh)"
看项目 readme 还是写的非常详细的,安装好后重启 wsl 便是用的 oh my zsh
此时我们可以根据该项目 readme 切换主题
1
2
sudo apt-get install vim #debain 默认命令 vi 并没有安装 vim
vi ~/.zshrc
克隆插件
1
2
git clone https://github.com/zsh-users/zsh-syntax-highlighting.git ${ZSH_CUSTOM:-~/.oh-my-zsh/custom}/plugins/zsh-syntax-highlighting
git clone https://github.com/zsh-users/zsh-autosuggestions ${ZSH_CUSTOM:-~/.oh-my-zsh/custom}/plugins/zsh-autosuggestions
修改
1
2
ZSH_THEME="agnoster"
plugins=(git zsh-syntax-highlighting zsh-autosuggestions z)
再加上我们的代理脚本,大家根据自己的情况修改。
1
2
3
4
5
6
7
8
9
10
11
12
13
14
15
# >>>终端配置代理 START <<<
host_ip=$(cat /etc/resolv.conf |grep "nameserver" |cut -f 2 -d " ")
proxy_ip=http://$host_ip:7890

alias poff='
unset http_proxy;
unset https_proxy;
unset socket5;
'
# 运行 pon 即可快捷打开代理
alias pon='
export http_proxy=$proxy_ip;
export https_proxy=$proxy_ip;
export socket5=$proxy_ip;
'
保存后
1
source ~/.zshrc
第二部分:在 WSL 中配置 CUDA 环境
2.1 更新系统
换源
1
2
3
4
sudo sed -i 's/archive.ubuntu.com/mirrors.ustc.edu.cn/g' /etc/apt/sources.list
sudo sed -i 's/security.ubuntu.com/mirrors.ustc.edu.cn/g' /etc/apt/sources.list
sudo apt update
首先启动 WSL 中的 Ubuntu(可以通过开始菜单启动,或在 PowerShell 中输入 wsl),然后执行:
1
sudo apt update && sudo apt upgrade -y
2.2 安装基本开发工具
1
sudo apt install -y build-essential git cmake wget curl
2.3 安装宿主机CUDA
https://developer.nvidia.com/cuda-downloads?target_os=Windows&target_arch=x86_64&target_version=10&target_type=exe_local
直接安装你看到的最新版本,无论你想用的深度学习库要求使用哪个版本的 CUDA
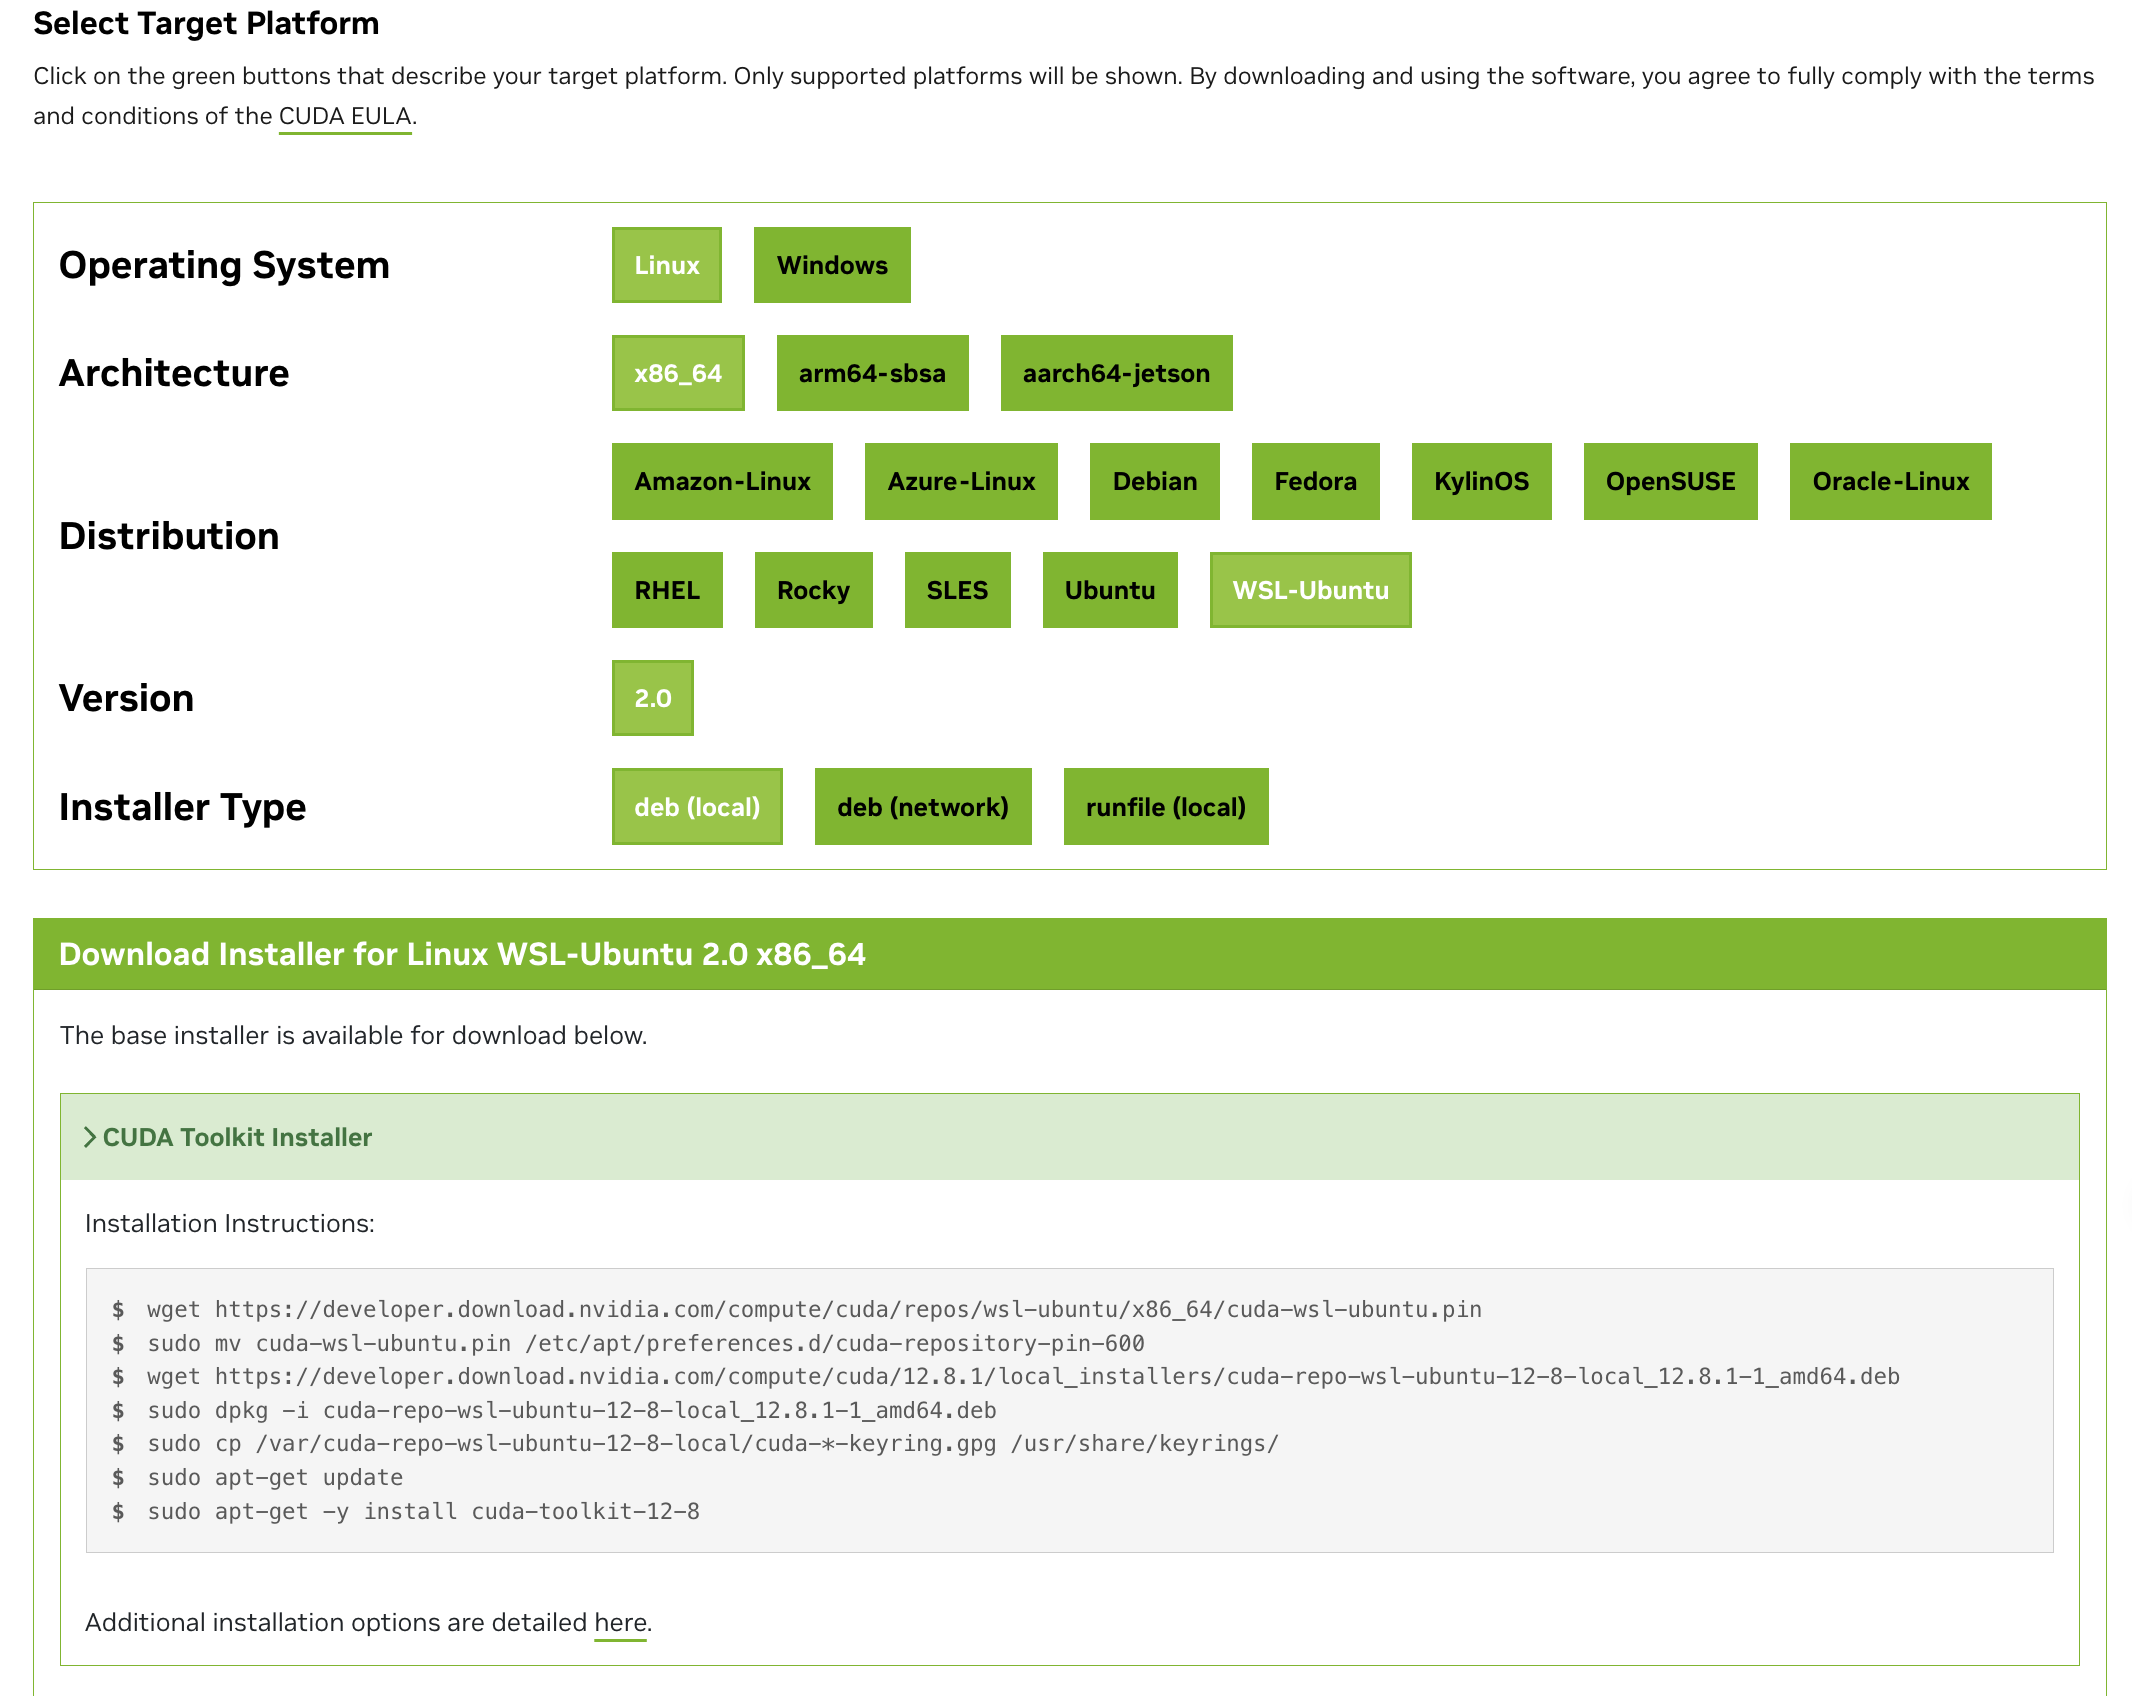
2.4 WSL中安装 CUDA Toolkit
将以下安装代码一行一行的复制进终端执行。注意安装之前要先在wsl里面输入
1
nvidia-smi
查看一下CUDA Version,上面显示的版本是你最高能安装到的版本
https://developer.nvidia.com/cuda-downloads?target_os=Linux&target_arch=x86_64&Distribution=WSL-Ubuntu&target_version=2.0&target_type=deb_local
第三部分:在 WSL 中安装和配置 Docker
3.1 安装 Docker
方法一,较为繁琐
1
2
3
4
5
6
7
8
9
10
11
12
13
14
15
16
17
18
19
sudo apt-get update

sudo apt-get install \
    apt-transport-https \
    ca-certificates \
    curl \
    gnupg \
    lsb-release


curl -fsSL https://mirrors.aliyun.com/docker-ce/linux/ubuntu/gpg | sudo gpg --dearmor -o /usr/share/keyrings/docker-archive-keyring.gpg

echo \
  "deb [arch=amd64 signed-by=/usr/share/keyrings/docker-archive-keyring.gpg] https://mirrors.aliyun.com/docker-ce/linux/ubuntu \
  $(lsb_release -cs) stable" | sudo tee /etc/apt/sources.list.d/docker.list > /dev/null

sudo apt-get install docker-ce docker-ce-cli containerd.io docker-compose-plugin
方法二,脚本自动化
1
2
3
4
5
# $ curl -fsSL test.docker.com -o get-docker.sh
curl -fsSL get.docker.com -o get-docker.sh
sudo sh get-docker.sh --mirror Aliyun
# $ sudo sh get-docker.sh --mirror AzureChinaCloud
启动 Docker
1
2
$ sudo systemctl enable docker
$ sudo systemctl start docker
建立 docker 用户组
默认情况下,docker 命令会使用 Unix socket (opens new window)与 Docker 引擎通讯。而只有 root 用户和 docker 组的用户才可以访问 Docker 引擎的 Unix socket。出于安全考虑,一般 Linux 系统上不会直接使用 root 用户。因此,更好地做法是将需要使用 docker 的用户加入 docker 用户组。
建立 docker 组:
1
$ sudo groupadd docker
将当前用户加入 docker 组:
1
$ sudo usermod -aG docker $USER
退出当前终端并重新登录,进行如下测试。
测试 Docker 是否安装正确
1
2
3
4
5
6
7
8
9
10
11
12
13
14
15
16
17
18
19
20
21
22
23
24
25
26
27
28
$ docker run --rm hello-world

Unable to find image 'hello-world:latest' locally
latest: Pulling from library/hello-world
b8dfde127a29: Pull complete
Digest: sha256:308866a43596e83578c7dfa15e27a73011bdd402185a84c5cd7f32a88b501a24
Status: Downloaded newer image for hello-world:latest

Hello from Docker!
This message shows that your installation appears to be working correctly.

To generate this message, Docker took the following steps:
 1. The Docker client contacted the Docker daemon.
 2. The Docker daemon pulled the "hello-world" image from the Docker Hub.
    (amd64)
 3. The Docker daemon created a new container from that image which runs the
    executable that produces the output you are currently reading.
 4. The Docker daemon streamed that output to the Docker client, which sent it
    to your terminal.

To try something more ambitious, you can run an Ubuntu container with:
 $ docker run -it ubuntu bash

Share images, automate workflows, and more with a free Docker ID:
 https://hub.docker.com/

For more examples and ideas, visit:
 https://docs.docker.com/get-started/
若能正常输出以上信息,则说明安装成功。
3.2 安装 NVIDIA Container Toolkit
这是用于Docker访问GPU
https://docs.nvidia.com/datacenter/cloud-native/container-toolkit/install-guide.html#installing-on-ubuntu-and-debian
在 WSL 中可以直接安装 Ubuntu 版本的 NVIDIA Container Toolkit。
1
2
3
4
5
6
7
8
9
curl -fsSL https://nvidia.github.io/libnvidia-container/gpgkey | sudo gpg --dearmor -o /usr/share/keyrings/nvidia-container-toolkit-keyring.gpg \
  && curl -s -L https://nvidia.github.io/libnvidia-container/stable/deb/nvidia-container-toolkit.list | \
    sed 's#deb https://#deb [signed-by=/usr/share/keyrings/nvidia-container-toolkit-keyring.gpg] https://#g' | \
    sudo tee /etc/apt/sources.list.d/nvidia-container-toolkit.list
sudo apt-get update
sudo apt-get install -y nvidia-container-toolkit
sudo nvidia-ctk runtime configure --runtime=docker
sudo systemctl restart docker
注: 使用 Docker 时,可以使用任意的比系统 CUDA 版本低的 CUDA 镜像。开发时请使用 devel 版本的 PyTorch 镜像,只有 devel 版本才包含编译器,可以编译 C++ 扩展。
第四部分:创建和配置 Docker 容器
这部分可以直接拉官方维护的镜像
以下是一个实例
步骤 2:拉取预配置的机器学习镜像
使用官方或社区维护的 GPU 支持镜像
1
docker pull pytorch/pytorch:2.6.0-cuda12.6-cudnn9-devel
步骤 3:运行容器并挂载目录
1
2
3
4
5
6
7
8
9
10
11
12
13
14
15
16
17
18
19
20
21
22
23
docker run -it \
  --name ml-gpu-env \
  --hostname ml-workstation \
  --gpus all \
  -v $(pwd):/root/workspace \
  -p 8888:8888 \
  -p 6006:6006 \
  -p 2222:22 \
  --shm-size=8g \
  pytorch/pytorch:2.6.0-cuda12.6-cudnn9-devel \
  /bin/bash

docker run -it \
  --name ml-gpu-env \            # 给容器一个有意义的名称
  --hostname ml-workstation \    # 设置容器内的主机名
  --gpus all \                   # 启用 GPU
  -v $(pwd):/workspace \         # 挂载当前目录到容器的 /workspace
  -p 8888:8888 \                # 映射 Jupyter 端口
  -p 6006:6006 \                # 映射 TensorBoard 端口
	-p 2222:22 \                  #
  --shm-size=8g \               # 共享内存设置大一点
  pytorch/pytorch:2.6.0-cuda12.6-cudnn9-devel \
  /bin/bash
步骤 4:在容器内验证环境
进入容器后,执行以下命令测试 GPU 是否可用:
1
2
3
4
5
# 检查 NVIDIA 驱动
nvidia-smi

# 检查 TensorFlow GPU 支持
python -c "import tensorflow as tf; print(tf.config.list_physical_devices('GPU'))"
步骤 5:扩展环境(可选)
1
2
3
4
5
# 安装 Jupyter Notebook
pip install jupyter

# 启动 Jupyter(在浏览器访问 http://localhost:8888)
jupyter notebook --ip=0.0.0.0 --allow-root
快速启动命令(一键运行)
1
docker run --name ml-environment --hostname ml-server --gpus all --shm-size=8g -it -p 8888:8888 -p 6006:6006 -v $(pwd):/workspace pytorch/pytorch:2.6.0-cuda12.6-cudnn9-devel /bin/bash
4.1 创建一个基于 Ubuntu 22.04 的 Docker 容器
我们将创建一个带有自定义主机名的 Ubuntu 容器,并将其作为开发环境:
1
2
# 创建并启动一个带有 GPU 支持和自定义主机名的交互式容器
docker run --name ml-environment --hostname ml-server --gpus all --shm-size=8g -it -p 8888:8888 -p 6006:6006 -v $(pwd):/workspace ubuntu:22.04 /bin/bash
命令说明:
--name ml-environment:容器名称--hostname ml-server:容器内的主机名--gpus all:允许容器访问所有 GPU-it:交互模式-p 8888:8888 -p 6006:6006:端口映射(Jupyter 和 TensorBoard)-v $(pwd):/workspace:将当前目录挂载到容器内的 /workspace
4.2 在容器内进行必要配置
现在您已经进入容器的 shell 环境,执行以下步骤来配置机器学习环境:
1
2
3
4
5
6
7
8
9
10
11
12
# 更新包管理器
apt update
# 安装必要工具
apt install -y sudo vim wget curl git build-essential python3 python3-pip
# pip换源
pip config set global.index-url https://mirrors.aliyun.com/pypi/simple/
# 升级
pip pip3 install --upgrade pip
# 安装基本的机器学习库
pip3 install numpy pandas matplotlib seaborn scikit-learn jupyterlab jupyterlab-language-pack-zh-CN
# 安装深度学习框架(选择您需要的)
pip3 install tensorflow torch torchvision torchaudio
4.3 将已配置的容器保存为镜像
在另一个终端(不是容器内)执行以下命令,将已配置的容器保存为新镜像:
- 首先,按
Ctrl+P然后Ctrl+Q离开容器但不终止它,或者在容器中输入exit - 在 WSL 终端中执行:
1
2
3
# 将容器保存为镜像
docker commit ml-environment my-ml-image:v1 # 如果容器已退出,可以用新镜像重新创建
docker run --name ml-environment --hostname ml-server --gpus all --shm-size=8g -it -p 8888:8888 -p 6006:6006 -v $(pwd):/workspace my-ml-image:v1
第五部分:配置网络以实现局域网访问
由于 Windows 10 不支持 WSL 的 mirrored 网络模式,我们需要通过端口转发来实现局域网对 WSL 和 Docker 服务的访问。
真不想更新win11口阿!
https://github.com/HobaiRiku/wsl2-auto-portproxy
直接用这玩意,能自动的检测wsl开的端口并设置转发。很方便。 我是直接下载release里面的exe,然后允许就好了。
第六部分:日常使用指南
6.1 启动和停止 Docker 容器
1
2
3
4
5
6
7
8
# 在 WSL 中启动 Docker 服务
sudo service docker start
# 启动已有容器
docker start ml-environment
# 进入正在运行的容器
docker exec -it ml-environment bash
# 停止容器
docker stop ml-environment
6.2 在容器中运行服务
1
2
3
4
# 运行 Jupyter Notebook
jupyter notebook --ip 0.0.0.0 --port 8888 --allow-root --no-browser
# 运行 TensorBoard tensorboard
--logdir ./logs --bind_all
第七部分:关于SSH进Docker丢失环境变量的问题
换到新的配置流程Win11下的WSL2配合Docker搭建深度学习环境]]之后这种情况便消失了,也不知道为什么。
如下文章写的比较好
https://www.cnblogs.com/zhenyuyaodidiao/p/9287497.html
https://blog.spider.im/post/enviroment-in-docker/
https://blog.csdn.net/m0_59029800/article/details/125479518
以下内容节选自https://blog.spider.im/post/enviroment-in-docker/
首先我们的目标是:
容器里的环境变量,对于跑在容器内的程序按理,应该直接就可以获得,即直接从各种语言的读取环境变量的方式就可以了。
docker帮我们实现了:启动的时候entrypoint拿到的是正确的环境变量,并且docker exec进入的时候环境变量是正确的,可获取到的。
但是用户有2种方式可能导致环境变量丢失:
可能用su - username的方式切换了账户导致环境变量丢失,注意这里虽然su - 的语义就是丢弃环境变量,但是我们认为k8s pod上设置的环境变量是全局可用的,我们也保证这样切换后设置的环境变量可用,当然你也可以不这么干
使用ssh的方式进入,这里又有两种 ssh进去进入login bash,或者就是ssh $ip xxxcommand 执行一个命令,进入一个nointeractive nologinbash的方式
这里2种其实都和bash对于环境变量文件的加载问题有关,所以看下bash这里的逻辑
背景知识:
bash有2种大的类型或者区别(这里不知道怎么描述)
- login:就是你登陆进去后获得的(第一个!)bash
- interactive:就是有终端提示符,可以敲命令那种。
相应的也有取非的情况,两两排列组合,bash一共有4种模式
- login+interactive 就是你ssh 登陆进去后那个
- login+nointeractive 不常见,主要是bash -l script.sh 有时候我们在某些系统的运行脚本设置里面会这么写(比如监控的自定义命令监控)
- interactive+nologin 就是你开的各种终端模拟器开的那些 比如gnome-terminal那些标签页
- nointeractive+nologin 这种其实容易被遗忘,但这就是上次查问题所在 ssh $ip xxxxcommand 的情况
与此同时,系统有一堆文件,bash会去读,具体就不一个个说明了,总结如下:
bash的每种模式会读取其所在列的内容,首先执行A,然后是B,C。而B1,B2和B3表示只会执行第一个存在的文件:
1
2
3
4
5
6
7
8
9
10
11
12
13
14
15
16
17
18
+----------------+--------+-----------+---------------+
|                | login  |interactive|non-interactive|
|                |        |non-login  |non-login      |
+----------------+--------+-----------+---------------+
|/etc/profile    |   A    |           |               |
+----------------+--------+-----------+---------------+
|/etc/bash.bashrc|        |    A      |               |
+----------------+--------+-----------+---------------+
|~/.bashrc       |        |    B      |               |
+----------------+--------+-----------+---------------+
|~/.bash_profile |   B1   |           |               |
+----------------+--------+-----------+---------------+
|~/.bash_login   |   B2   |           |               |
+----------------+--------+-----------+---------------+
|~/.profile      |   B3   |           |               |
+----------------+--------+-----------+---------------+
|BASH_ENV        |        |           |       A       |
+----------------+--------+-----------+---------------+
另外通常情况下~/.bash_profile 里面都会加载~/.bashrc ,~/.bashrc里面又会加载/etc/bashrc 所以你平常加的时候,看起来到处加了都生效,但其实是上面的顺序。
除此之外login bash中B1 B2 B3 是有一个就不执行另外一个,所以通常不建议使用.bash_login 然后其实.profile 的目的是兼容非bash的,比如csh之类的,优雅点,可以.bash_profile里面写bash相关的,然后在.bash_profile里面自己主动加载下.profile(考虑到这个时候bash看到有.bash_profile是不会去加载.profile的)
很好的文章!
解决方法
方法一
1
2
export $(cat /proc/1/environ |tr '\0' '\n' | xargs)
source /etc/profile
方法二
1
2
#需要修改 /etc/pam.d/password-auth 成
auth required pam_env.so envfile=/etc/environment
总结
本教程详细介绍了如何在 Windows 10 中配置 WSL 2、CUDA 环境和 Docker,并通过端口转发实现局域网对 WSL 和 Docker 容器内服务的访问。通过这种配置,您可以在 Windows 系统上拥有一个功能强大的机器学习开发环境,同时允许局域网中的其他设备(如平板电脑或笔记本电脑)访问您的服务。
请注意,由于 WSL 2 使用的是 NAT 网络模式,您需要手动维护端口转发规则,特别是在 WSL 的 IP 地址发生变化时。未来版本的 Windows 可能会提供更简便的网络配置方法,但目前这是在 Windows 10 上实现局域网访问 WSL 服务的最可靠方式。
通过这种设置,您可以在熟悉的 Windows 环境中享受 Linux 和 Docker 的强大功能,同时充分利用 NVIDIA GPU 进行机器学习和深度学习任务。
1
2
3
4
5
6
7
8
9
10
11
12
13
14
15
16
17
docker run --gpus all -it \
  --name ml_container \
  --shm-size=8g \
  -p 8888:8888 \
  -p 6006:6006 \
  -p 8080:8080 \
  -p 5000:5000 \
  -p 2225:22 \
  --ulimit memlock=-1 \
  --ulimit stack=67108864 \
  --privileged \
  --init \
  --cap-add=SYS_ADMIN \
  --security-opt seccomp=unconfined \
  -v /sys/fs/cgroup:/sys/fs/cgroup:ro \
  -v $(pwd):/workspace \
  swr.cn-north-4.myhuaweicloud.com/ddn-k8s/docker.io/nvidia/cuda:12.6.3-cudnn-devel-ubuntu24.04
参考
https://programnotes.cn/wsl-how-change-disk-location/
https://duanyll.com/2024/6/30/WSL2-Docker-Deep-Learning/#step-5—%E5%9C%A8-wsl-%E4%B8%AD%E5%AE%89%E8%A3%85-cuda
https://zhuanlan.zhihu.com/p/425312804
https://vuepress.mirror.docker-practice.com/install/ubuntu/
https://zhuanlan.zhihu.com/p/153124468
https://zhuanlan.zhihu.com/p/68336685